On May 31, 2021, my Boss 302 turned 10 years old! For this and various other reasons, I decided to treat my punk rock girl to some front-end upgrades.
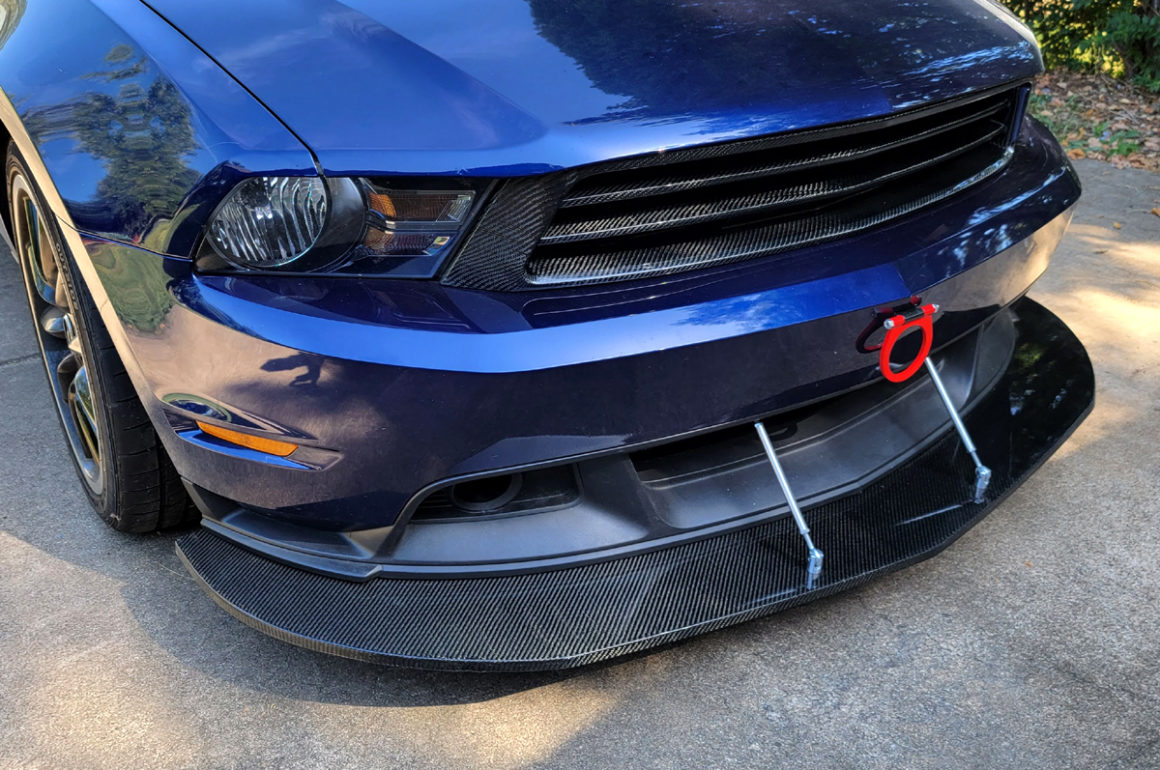
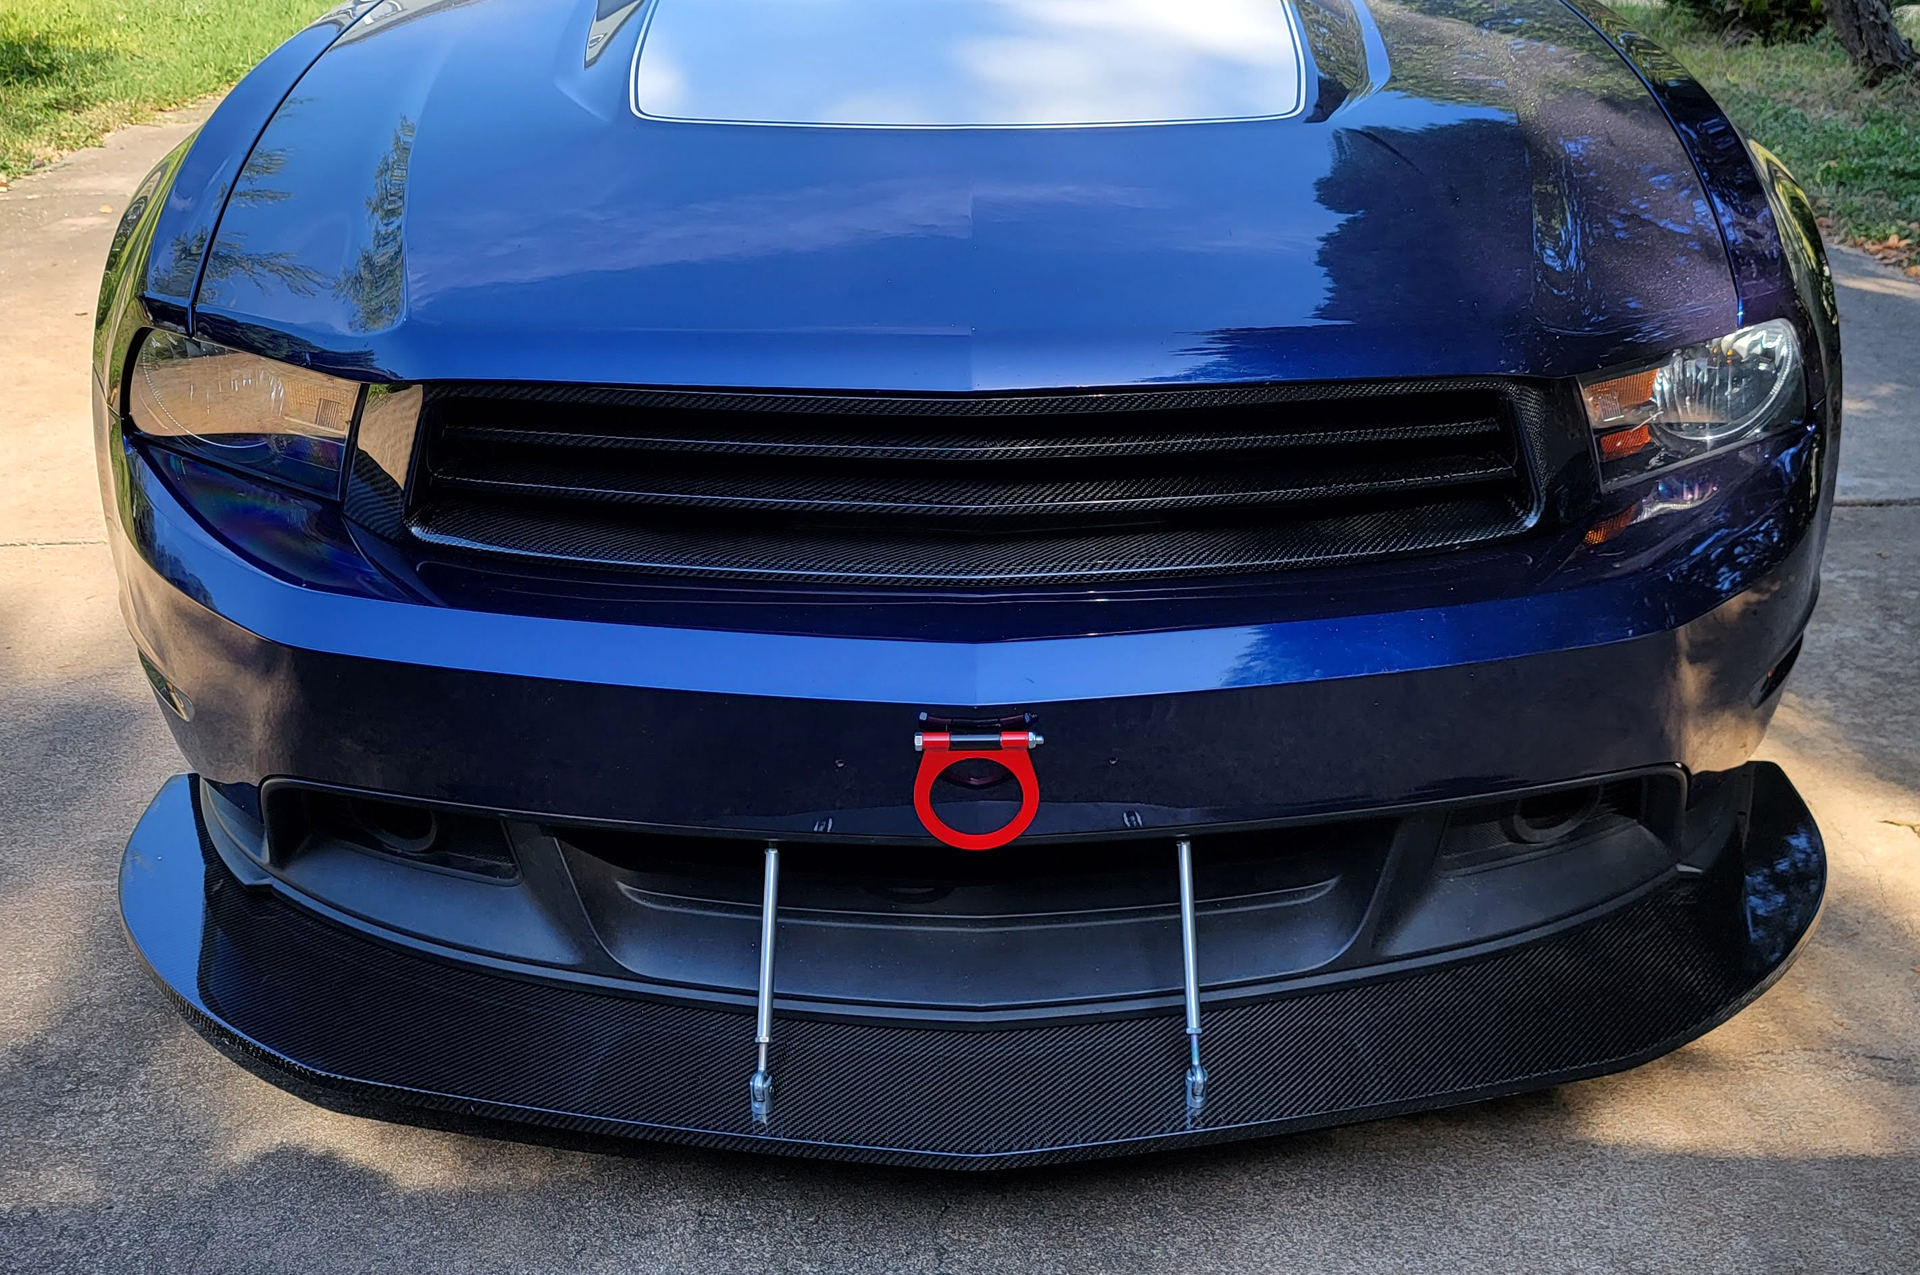
The primary goal of this exercise was to reduce excessive oil temperatures on the track by adding a front mounted oil cooler. I also replaced the stock grille with one that was less restrictive and added a front splitter and tow ring. All of this additional hardware added some weight to the front of the car, so I attempted to offset that additional weight by replacing the bumper with a lightweight racing bumper.
Front Mounted Oil Cooler
I have been complaining about the high oil temperatures in my car, ever since the day I got an oil temperature gauge back in 20131. In my April 2017 post about my track day at Texas World Speedway2, I declared that an oil cooler would be installed immediately to address the excessive oil temps my car sees on track. That was almost exactly four years ago. I guess I got distracted.
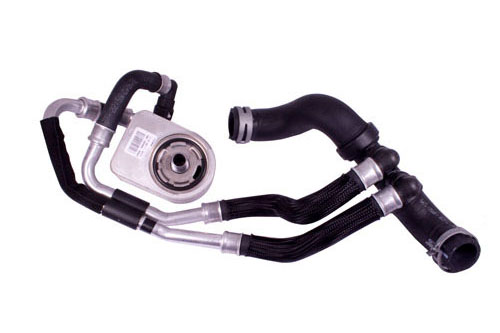
The Boss 302 comes with a water-to-oil type oil cooler (M-6642-MB), but as I found out, it is inadequate for the demands of track duty. And to Ford engineers, this was not unexpected:
“Consideration was given to an external oil cooler, but ultimately it was decided not to penalize all Coyote buyers for the occasional antics of a miniscule fraction of owners. Oil temperature rises precipitously when the Coyote is revved more than 4,500 rpm for extended periods, and then an external oil-to-air cooler is vital. But those conditions can only be reached on a road-racing track, so the expensive cooler was ditched and engine management strategies were used to protect the engine during hot idles. However, the mounting area for the cooler was “protected” during the 2011 Mustang’s development. That makes it easier for the open-trackers among us to fit a cooler (highly recommended by Coyote engine designers), and tells you something about Ford’s intentions for special editions of the Coyote-powered Mustangs.” – 5.0 Mustang & Super Fords (March 2010)
So, the correct solution, as usual, is to copy the Boss 302R/302S and install a proper front-mounted oil cooler. Ford Racing sold this front-mounted oil cooler as a kit (M-6642-MBA, now discontinued), which provided a template for me and other antic-prone open-trackers to use to develop our own setups.
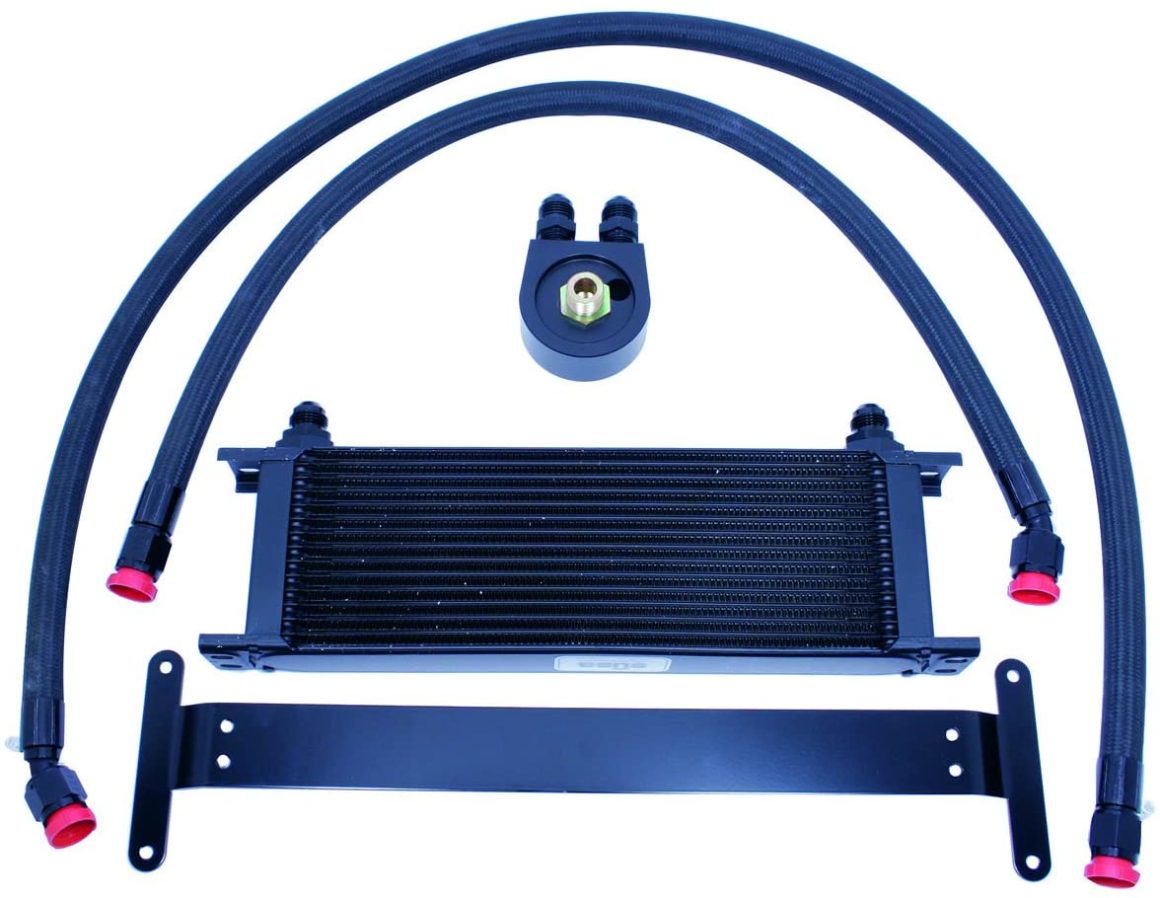
There isn’t much to the Ford Racing oil cooler kit: a Canton sandwich plate that fits between the Boss 302 stock oil cooler and the oil filter, two hoses (one in, one out) which lead to a Setrab oil cooler, which is mounted to the radiator support by a bracket. So, why not just buy the Ford Racing kit? Aside from it being discontinued, if I could still find one, it would cost around $1250, which is an outrageous price for a kit made up of parts that can be sourced individually for far less than half that amount. Perhaps more importantly, despite the apparent simplicity of an oil cooler, there are a few considerations that affected my selection of specific components.
Oil Cooler Core
Literally, the biggest difference between the Ford Racing Oil Cooler Kit and mine is the size of the core. They are both Setrab ProLine STD 9-series cores, but Ford Racing used a 15-row core (50-915-7612) and I will be using a 48-row core (50-948-7612). These cars get very hot, very fast and I wanted as much cooling capacity as possible. Also, I live in Texas. It’s hot here – like, surface of Mercury hot.

Even according to the Setrab guidelines shown in the chart above, Ford Racing’s 15-row cooler is inadequate for the Coyote engine. One could argue that I overdid it with my “Texas Edition” cooler, but if the unimaginable happens and I have a problem with low oil temps, I can manage that by blocking off a portion of the cooler. You can remove cooling capacity from a cooler that is too large, but you can’t add cooling capacity to a cooler that’s too small.
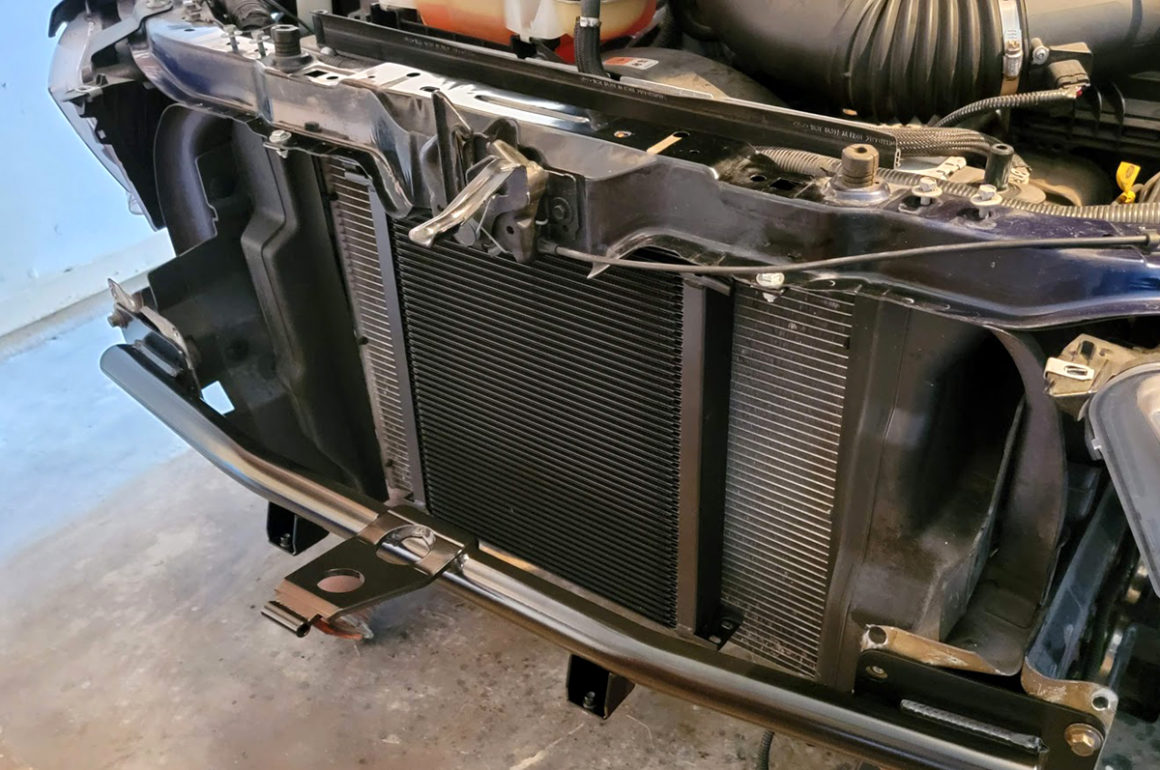
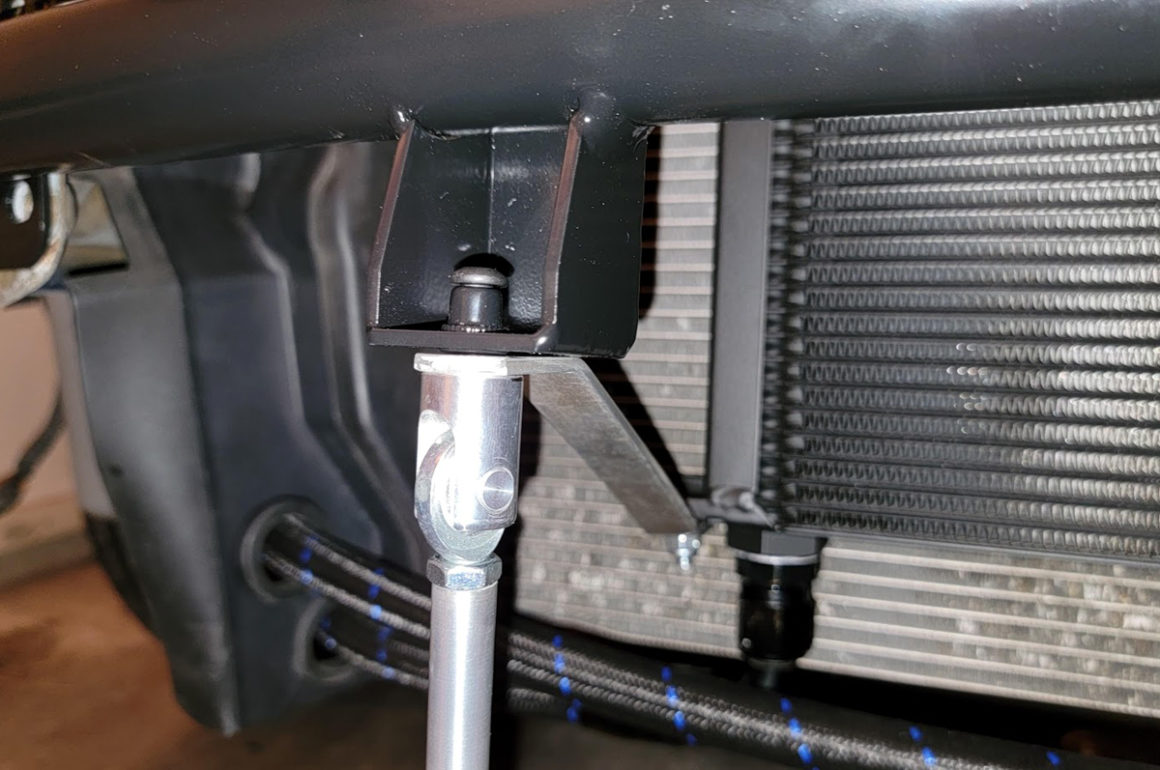
I mounted the oil cooler to the upper radiator mount using a custom bracket made by a member of Track Mustangs Online. The bracket was a beautiful bit of engineering that used three pre-existing holes and required drilling only one additional hole. The oil cooler I used was so large that I decided to make lower mounting brackets that secured it to the splitter support rod mounting points on the new Ford Racing lightweight tubular bumper.
Sandwich Plate
The second most important consideration is the sandwich plate. The Ford Racing oil cooler kit used a Canton sandwich plate adapter. Canton is a reputable company that engineers and manufactures quality racing components, but their sandwich adapter does not accommodate sensors for gauges.
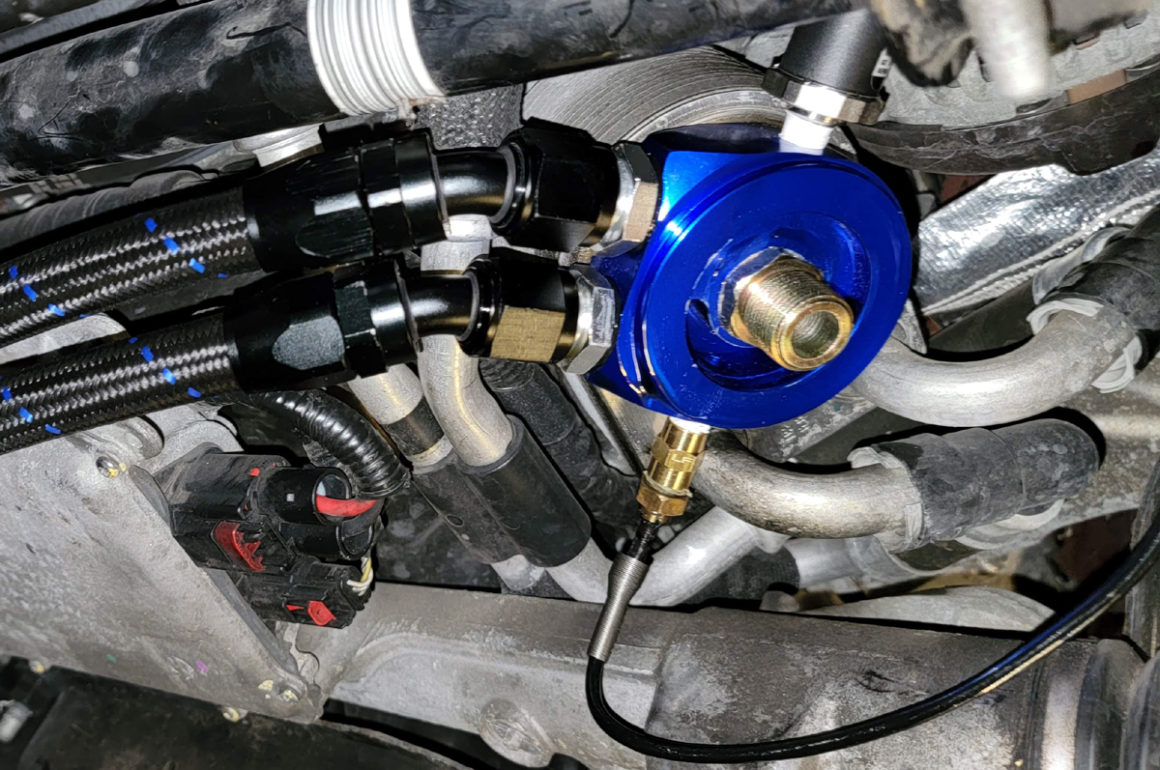
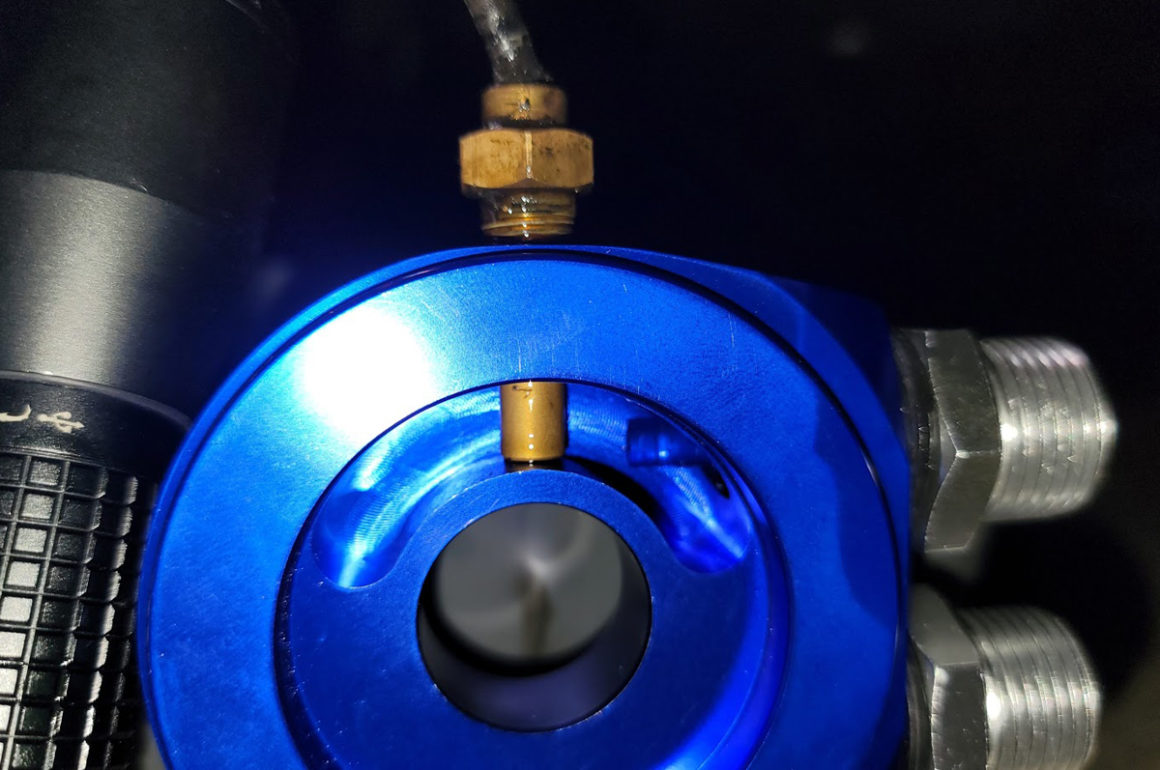
My sensors were already installed in a Prosport Performance sandwich plate1 and I didn’t want to reroute them or use alternate locations I had seen used in other setups, such as replacing the oil level sensor in the oil pan.
There was another problem. The oil cooler leaked! I needed to make some revisions.
I had to replace the Prosport Performance sandwich plate, because it did not have the M22x 1.5 ports I needed to for the oil cooler, so I chose a sandwich plate from CX Racing that had those ports and the 1/8″ NPT ports for my oil temp and oil pressure sensors.
Another consideration, especially for cars in cold weather climates, is the need for a thermostat to bypass the oil cooler to improve oil warm-up time. Really nice external thermostats are available and Mishimoto makes a high-quality and popular sandwich plate with an integrated thermostat.
Hoses
Everyone has an opinion about hoses, hose material, and hose ends, but this is one area in which I stay above the fray (*snort*). As long as the hose meets the spec for temp, pressure, and material, choose what looks good, is affordable, or during a pandemic, what’s in stock. I chose a nylon braided racing hose with a natty blue stripe from Vibrant Performance, along with the appropriate hose ends and fittings. The most important thing to note here is that I bought 10 ft. of hose, routed it in the longest way possible, and had less than a foot left. So, 10 ft. should do it, but measure carefully before cutting.


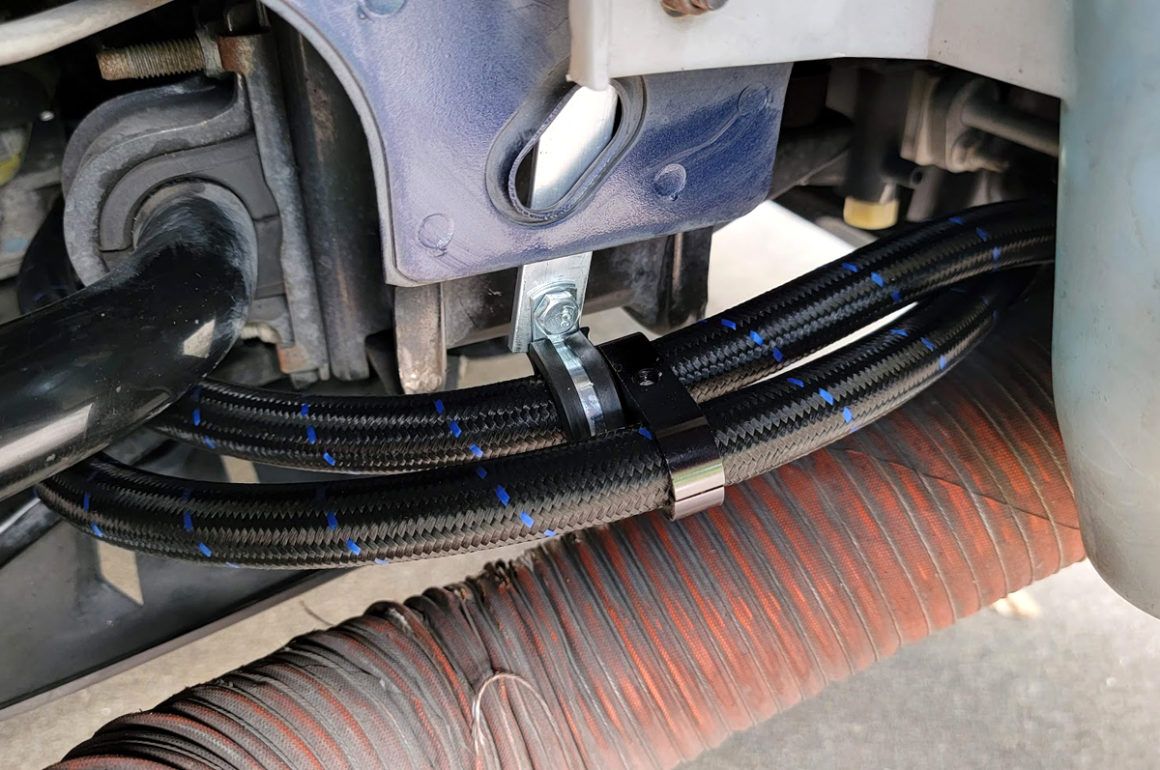
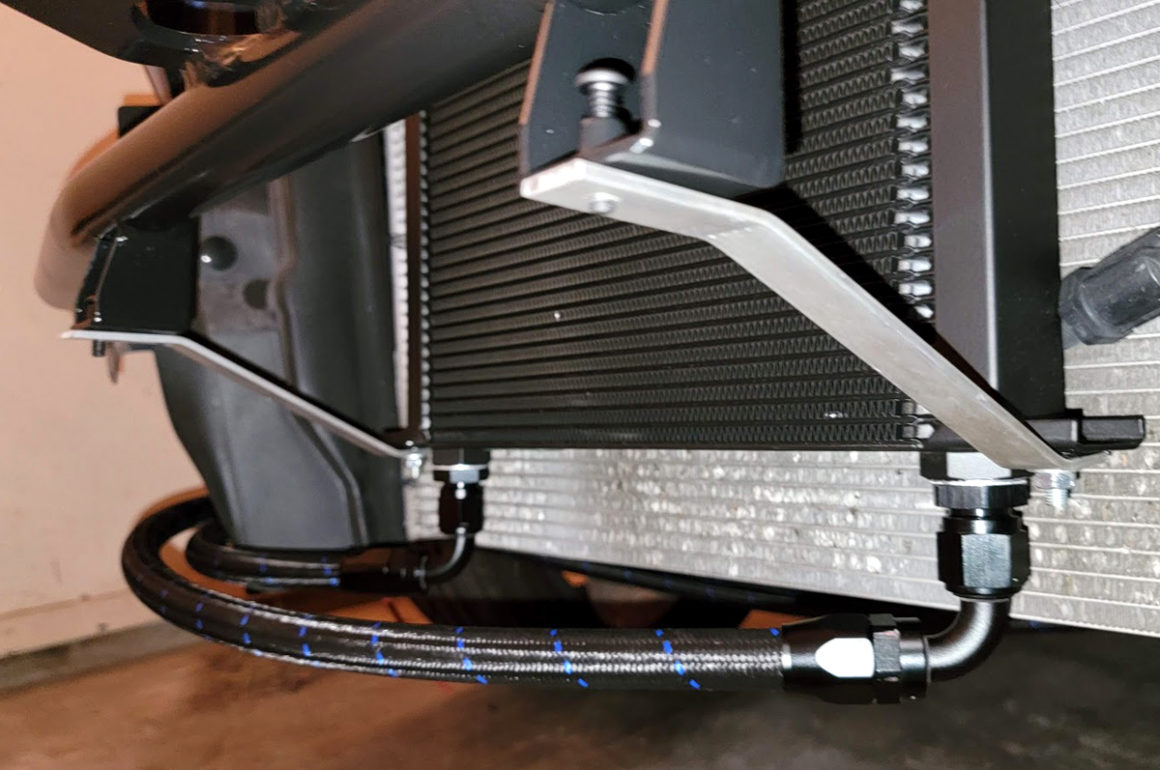
I routed the hoses from the sandwich plate, along the steering rack and then curled them around to the front of the car, through the radiator shroud, and into the oil cooler. The hoses are tied together where possible and mounted to the steering rack and from a hanging mount that I fabricated.
Problems and Revisions
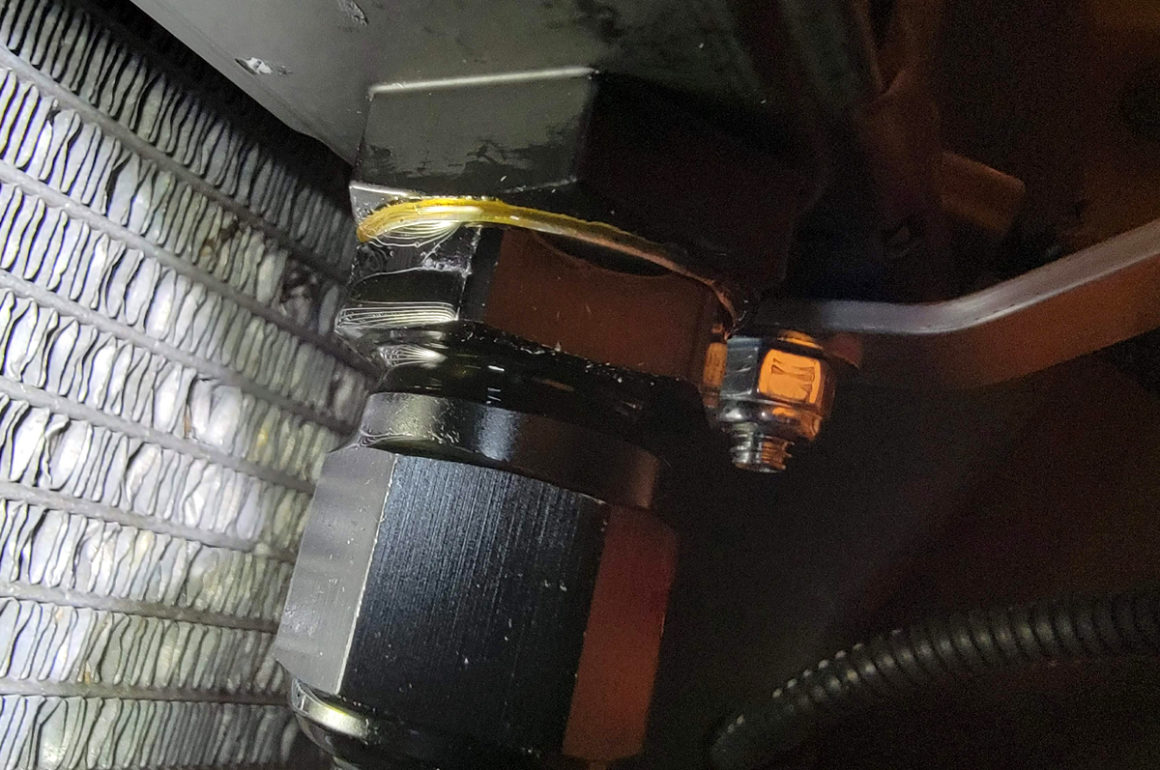
Ultimately, I was unhappy with this setup. Packaging is tight around the oil filter and I felt like the position of the fragile gauge sensors put them at risk of being damaged. The routing of the sensor wires also had them running so close to the headers that it required the use of high-temp sheathing. Finally, the oil temp sensor bottomed out in the new sandwich plate, requiring the use of an adapter. Not only did I not like the adapter, but it also extended the sensor even further out from the sandwich plate, making acceptable positioning even more difficult.
There was another problem. The oil cooler leaked! I needed to make some revisions.
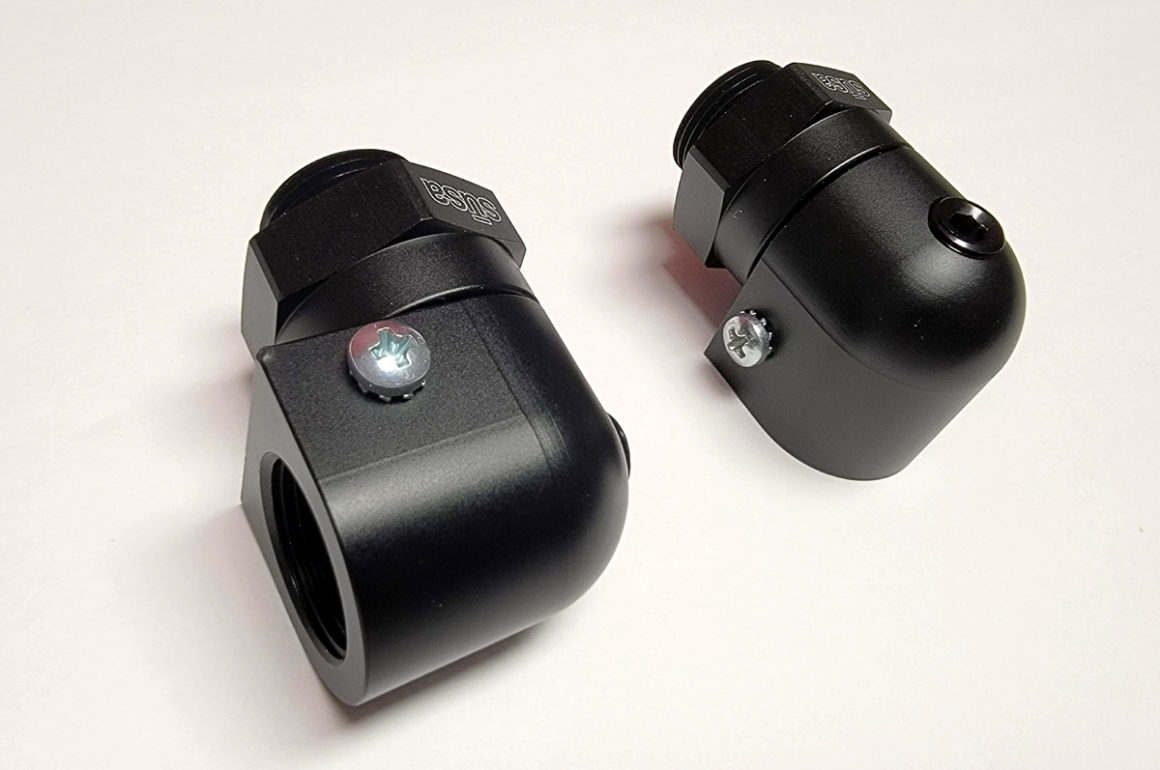
The first order of business was to relocate the oil temp and oil pressure gauges. To do that I found these brilliant 90º port adapter fittings from Setrab that take the place of the 90º AN hose fittings going into and out of the oil cooler. The port adapters have an M22x 1.5 thread for the metric-to-AN adapter, which then attaches to the hose ends, but also has a 1/8″ NPT threaded port to accommodate sensors!
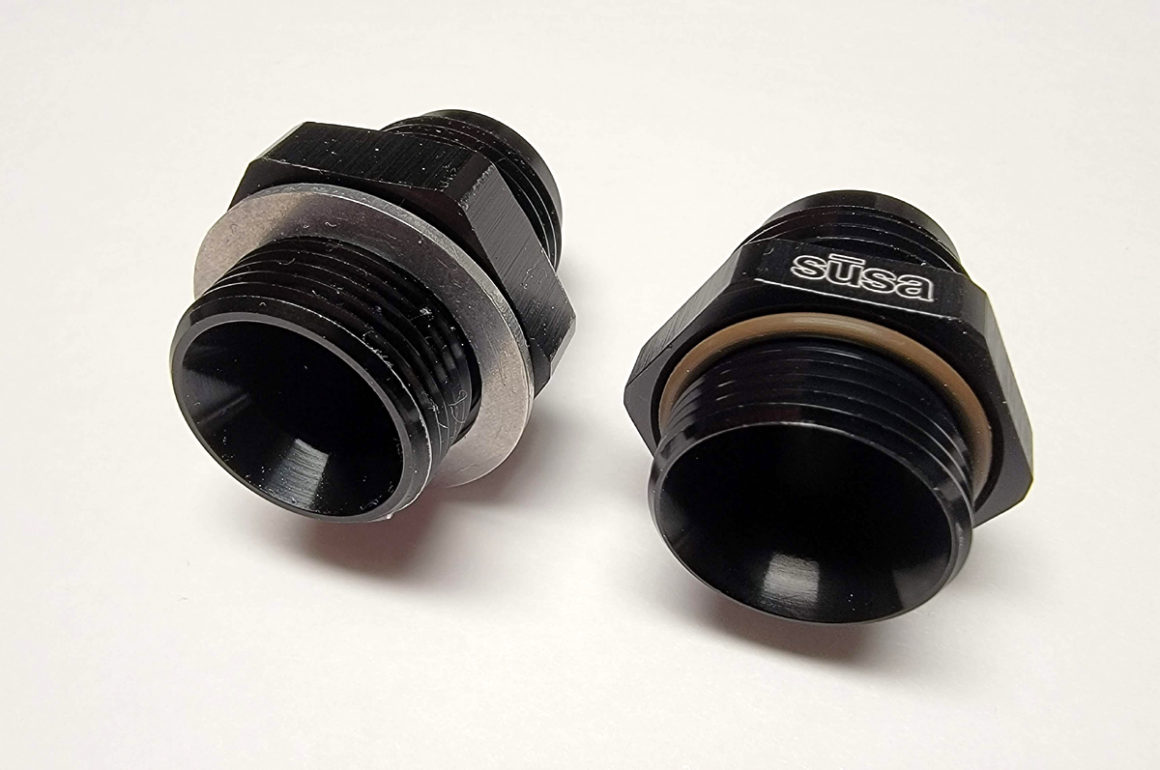
I also ordered the Setrab metric-to-AN adapter and in doing so, found the source of my leak. I had previously used a Vibrant Performance fitting and while technically the same size, was quite different from the Setrab in dimensions and most importantly – in sealing gasket style.

In order to use the new port adapters, I had to change the hose ends from 90º to straight. The hoses were brand new and hadn’t been used for more than a few minutes, so I was able to just replace the hose ends with no trouble or apparent damage to the hose itself.
I screwed everything together, moved the sensors to the port adapters, plugged the NPT ports in the sandwich adapter, and started the car. The bright white puppy pads I had put under the car stayed clean and didn’t show a single drop of oil!

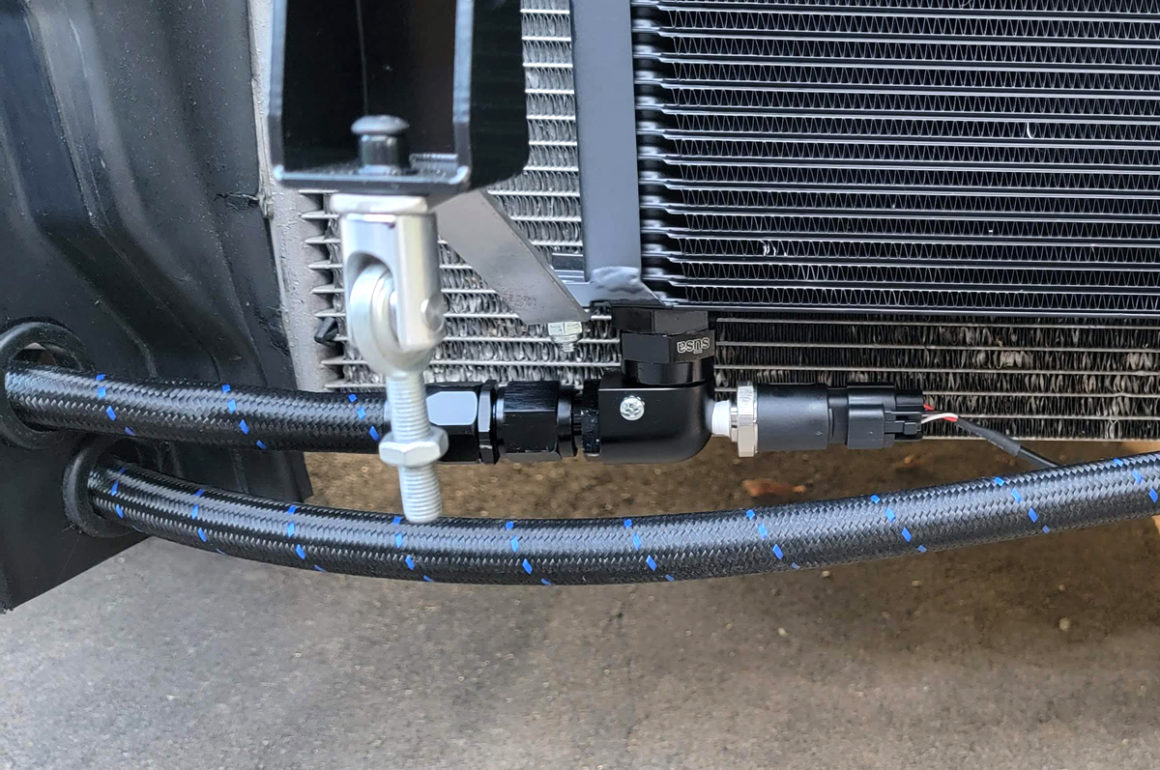
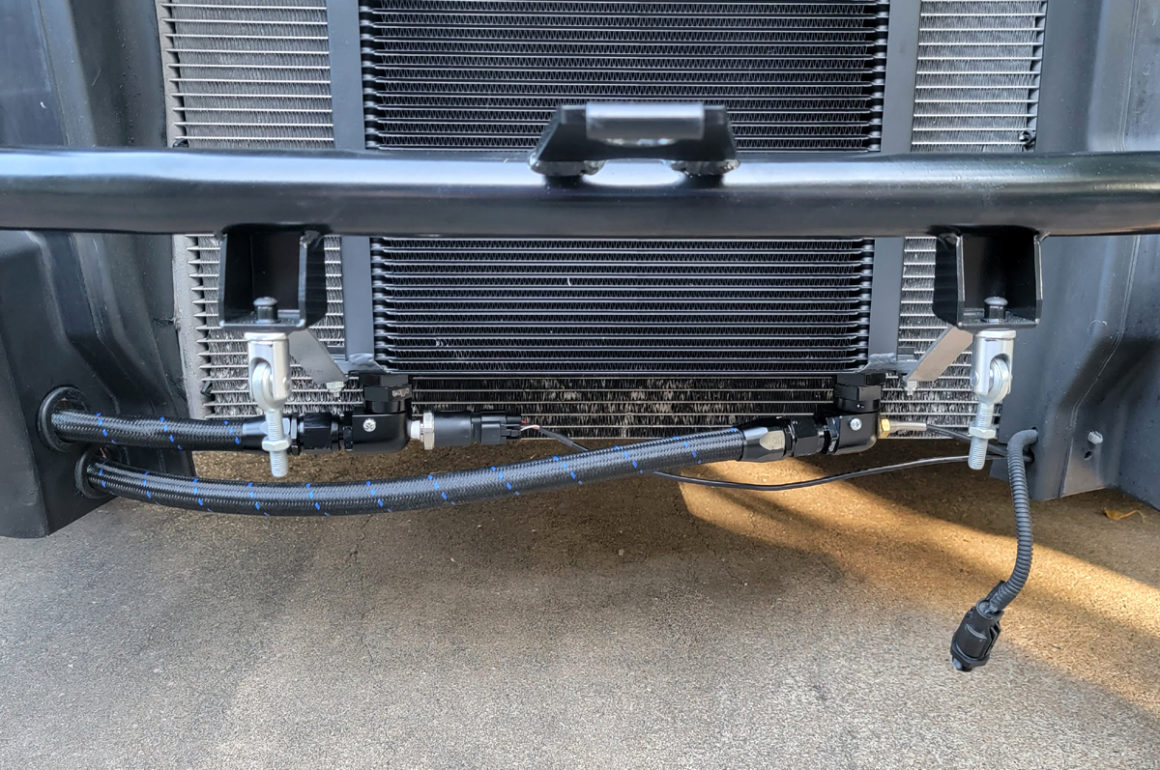
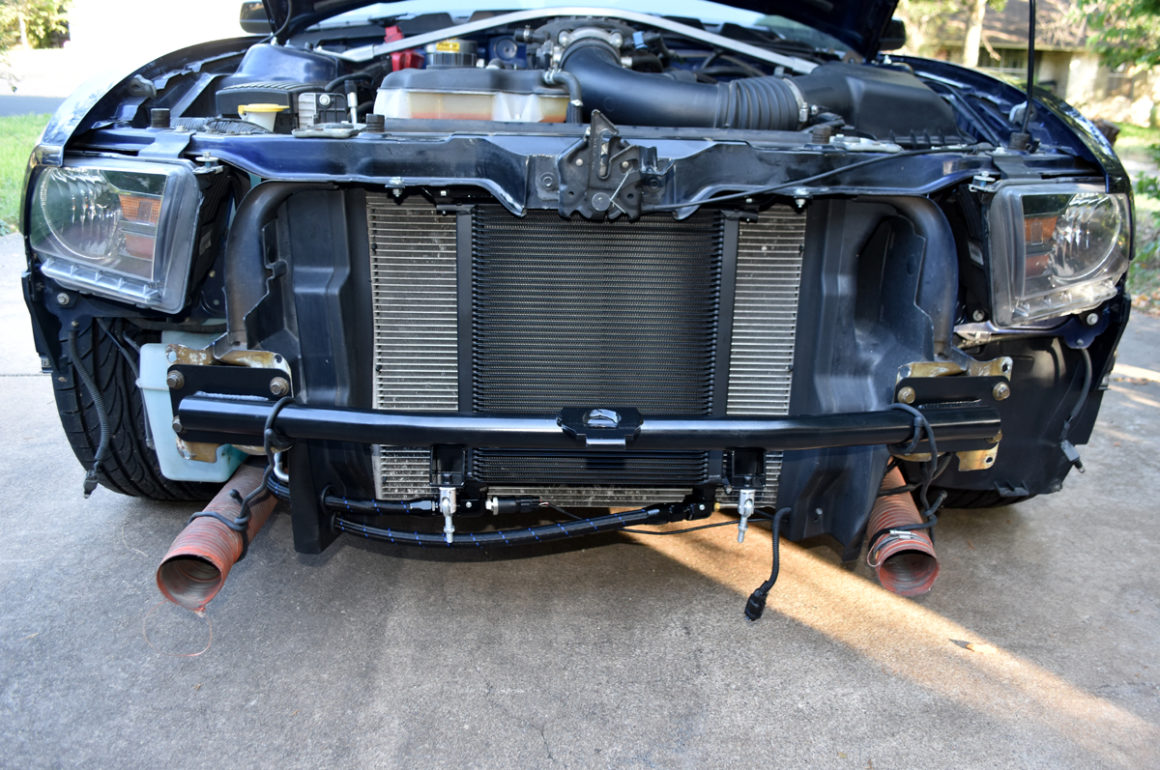
I am thrilled that I happened upon the Setrab 90º port adapters. I don’t think I have ever seen them used on any other Boss DIY oil cooler. I love that the sensors are now up front for easy access. I was also able to route the sensor wires around the perimeter of the engine bay, so there was no need to use a heat sleeve or wrap.
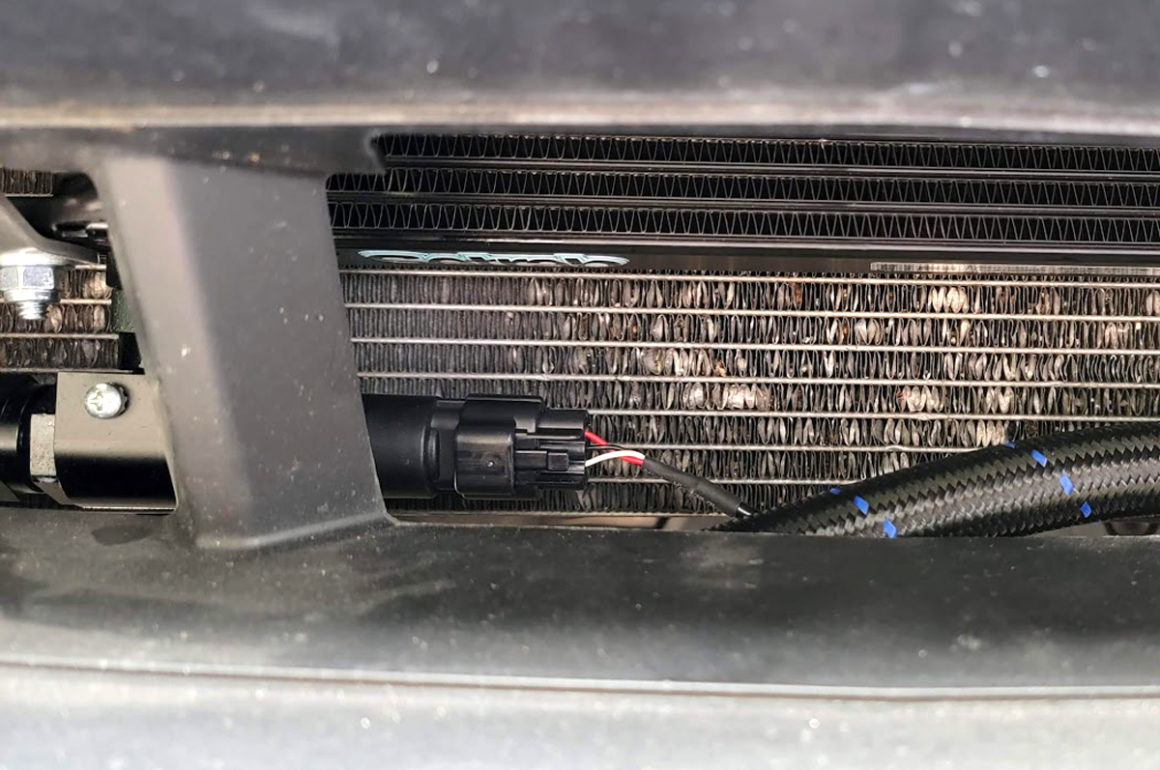
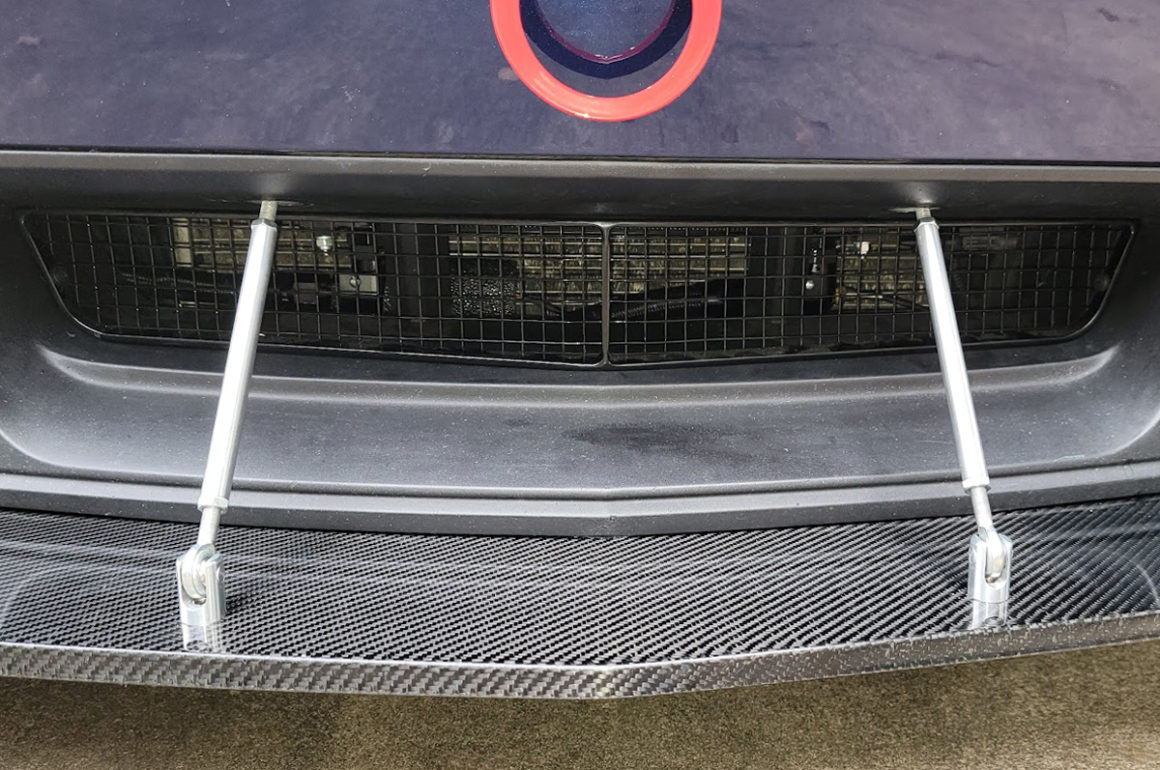
However, the sensors are now exposed in the lower opening of the bumper cover and could be damaged by a rock strike or other FOD, so I put a protective wrap around the plastic-bodied oil pressure sensor. I also installed a custom lower grille (also made by a Track Mustangs Online forum member) into the lower bumper cover opening. The AC condenser has obviously taken a beating by not having any protection in that area.
Testing
I have the ability to log oil temps, but unfortunately, I lost all of my past log files, including a baseline warm-up file. Luckily, I documented enough detail in my write-up3 that I was able to recreate the warm-up scenario. Previously, I had let the car idle for 10 minutes on a 96º F afternoon and then took a 4 minute sample. So, I waited until it was 96º F, started the car, let it idle (A/C on), and logged the oil temps for 20 minutes. I was very pleased with the results:


Oil temps at idle from 10-14 minutes (96º F ambient temp):
Without oil cooler: 176º-187º F
With oil cooler: 151º-158º F
There will be more testing conducted in the near future, with the ultimate test being a proper track shakedown.
Grille
Replacing the restrictive stock Boss grille is so important to improved cooling performance, some open-trackers/racers suggest that it is more important than adding a front mounted oil cooler. I hated losing the stock grille, which is unique to the Boss and its identity, but on a track car, form must follow function. So, I purchased an open-design, bar-type grille and as a compromise to form, it is constructed of carbon fiber that compliments the carbon fiber splitter. It is also lighter than the stock grille, though it is an inconsequential difference.
Then I decided to try and quantify how much better it would flow, by at least trying to take a stab at measuring the improvement in (open) frontal area. I fixed a camera on a tripod and backlit the two grilles, being careful to locate them in the exact same place and as close to on-axis as I could. Then I used Photoshop to fill the open spaces with a unique color (Austin FC Verde!) and then used a program that counts the pixels of that unique color.
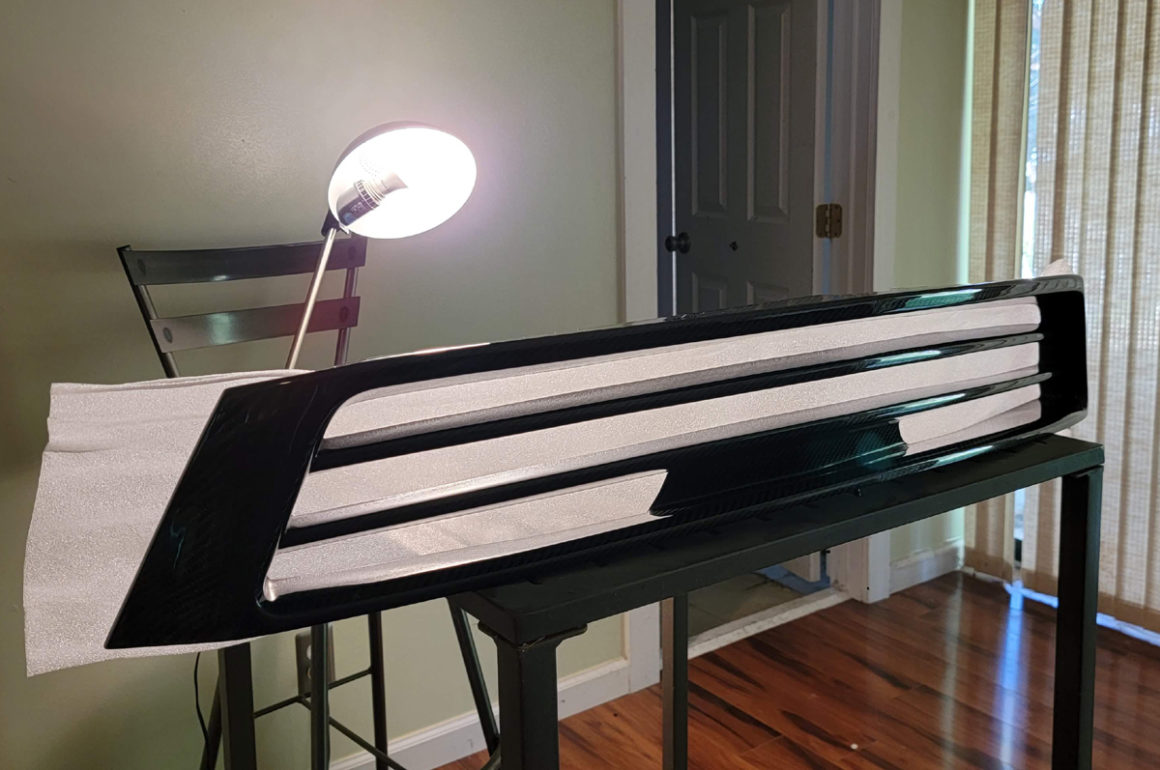


Even with the naked eye, one can see how much more restrictive the Boss grille is compared to the new grille. I plugged pixel counts into an online calculator and the result was a whopping increase of 176% in (open) frontal area! And this was compared against a modified Boss grille, on which I had drilled out the phony “rally-light mesh.”4 The improvement would have been even greater if measured against an unmodified Boss grille.
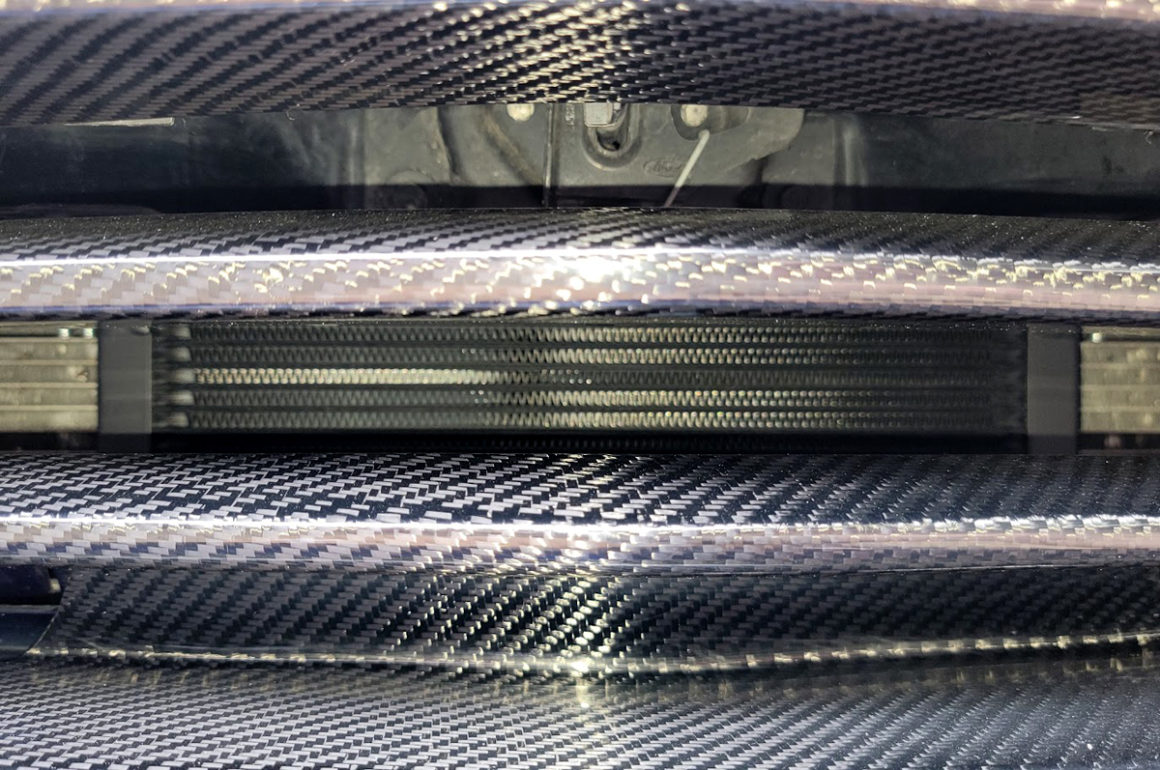
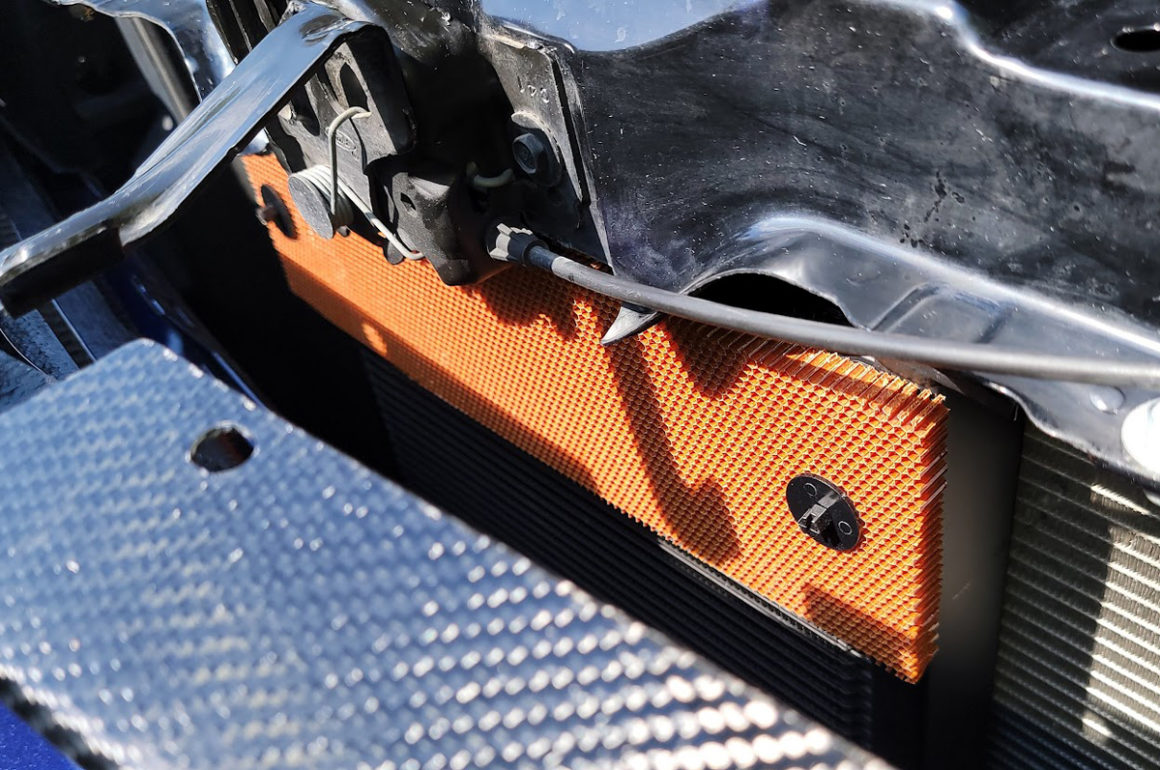
If there is a downside to the new grille, it is that it affords very little protection to part of the new oil cooler core, which is subject to FOD. So, I installed a sheet of protective honeycomb material that is designed to protect the core without impeding much airflow. Pro Tip: Install this BEFORE mounting the core.
Splitter
I haven’t started working on an aero program for the Boss, but I installed a splitter, because a splitter can improve air flow and therefore, cooling performance when there is an opening for the radiator and oil cooler in the high pressure area above the splitter, as is the case on the Boss.
The splitter is carbon fiber, because I’m extra. And it looks good. And it’s cheaper than the actual Boss splitter. Okay, so I guess this means I HAVE started on an aero program.
Lightweight Bumper
In an effort to try and offset the additional weight I was adding to the front of the car, I replaced the stock bumper with a lightweight tubular bumper from Ford Performance.
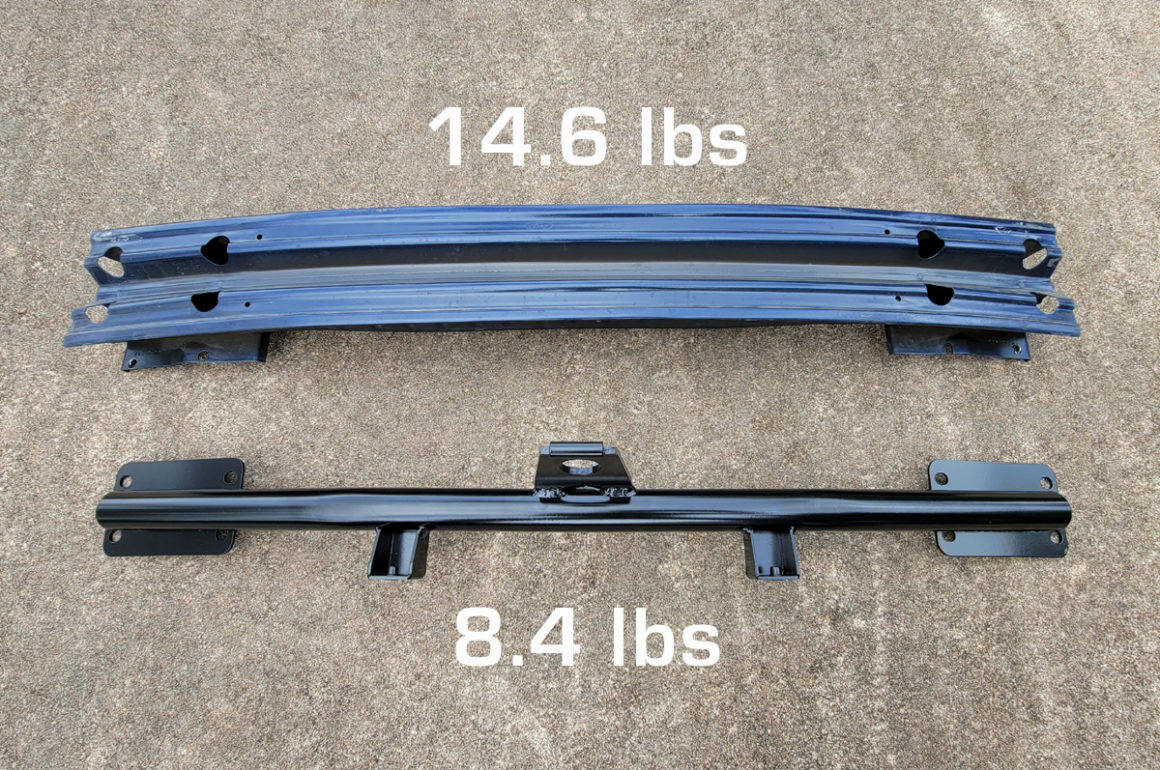
The tubular bumper weighs 8.4 lbs. and saved 6.2 lbs. over the stock bumper, but consider the tubular bumper also contains mounts for the splitter and tow hook. If I had retained the stock bumper, I would have also needed a Ford Performance splitter bracket (6.1 lbs.) and a tow hook mount (1.3 lbs.), so apples-to-apples bumper weight savings can be considered to be around 13.6 lbs..
The Setrab core and custom mount weighs 10. 2 lbs. or 3.4 lbs. less than a fully-laden stock bumper. I’m not Vorshlag, so I didn’t weigh the two hoses, fittings, lower brackets, or the extra quart(?) of oil that sits in the cooler, but using some back of the napkin figures, a lightweight tubular bumper will almost offset the additional weight of an oil cooler system (especially one that uses a smaller core).
Conclusion
After a rough start, I am very pleased with how this project finally came together and I am happy with all of the components and parts I chose. Initial testing looks promising, but the ultimate test will be at the track. Stay tuned for those results.

Appendix A: Footnotes
- https://jimmypribble.com/blog/2013/07/boss-ch-13-ford-racing-gauge-pod/
- https://jimmypribble.com/blog/2017/05/texas-world-speedway-april-28-2017/
- https://jimmypribble.com/blog/2013/08/boss-ch-14-ford-racing-gauge-pod-part-2/
- https://jimmypribble.com/blog/2011/10/ch-7-performance-mods/
Appendix B: Parts
Oil Cooler
- Setrab ProLine STD 9-series 48-row Oil Cooler (SET50-948-7612) – $475.39
- Custom Bracket – $61.90 (NLA)
- (2) sÅ«sa ProLine M22 M/F Port Adapter, 90º (22-M22-90-NPT18) – $141.44
- (2) Setrab M22 to 10AN Male Adapter, Straight (SET-M22AN10-SE) – $21.48
- (2) Vibrant Performance Fitting, Hose End, 30 Degree, -10 AN Female Threads, Aluminum, Black Anodized (VPE-21310) – $51.98
- (2) Vibrant Performance Fitting, Hose End, Straight, -10 AN Hose to Female -10 AN, Aluminum, Black Anodized (VPE-21010) – $21.90
- Vibrant Performance Hose, Flexible Race, Braided Nylon, Black/Blue, -10 AN, 10 ft. Length (VPE-11970B) – $78.99
- CX Racing AN 10 Aluminum Oil Cooler Filter Sandwich Adapter Plate – $39.00
Grilles
- (Upper) TRUFIBER 2010-2012 Mustang GT Carbon Fiber LG88 Bumper Grille – $329
- (Lower) Custom – $175 (NLA)
- Allstar Performance ALL30158 – Radiator Honeycomb Screen, Red, 19 in. x 26 in. x 1/2 in. – $23.99
Splitter
- TRUFIBER 2010-2014 GT/BOSS 302 CARBON FIBER LG86 FRONT SPLITTER – $398.99
- FULLY TORQUED RACING BOSS 302 SPLITTER SUPPORT RODS UPGRADE, PAIR (FTR-111-B302-HWP) – $71.98
Bumper
- FORD RACING 2005-2014 MUSTANG LIGHTWEIGHT TUBULAR FRONT BUMPER (M-17757-MB) – $275.40
Tow Hook
- FORD RACING TOW HOOK LOOP KIT (M-17954-A) – $43.70
Appendix C: Forum Posts
I have to thank all of the antic-prone open-trackers who have gone before me. The following threads on Track Mustangs Online were invaluable resources to me as I researched this project:
- https://trackmustangsonline.com/threads/my-diy-oil-cooler-install-a-few-pics.6652/
- https://trackmustangsonline.com/threads/removing-the-stock-oil-cooler-what-is-needed.7462/
- https://trackmustangsonline.com/threads/oil-cooler-question.5585/
- https://trackmustangsonline.com/threads/high-oil-temp-overheating-at-track.12182/







2 comments
Hi Jimmy.
I’ve been enjoying the various posts regarding your KBM Boss 302. Given I have the same car (#1710), I’ve embarked on a few similar mods.
Back in 2017, you mentioned on TMO that you’d purchased all the parts to R&R the stock Boss front 4-pot Brembos with S550 PP 6-pot Brembos. Have you completed the swap? If so, I’m curious about your impressions.
Thanks.
Hi Adam. Thanks for reading and commenting!
As it happens, I HAVE completed the swap and I have an incomplete post sitting in drafts right now in which I talk about the new brakes and the new H&R coil overs, which I installed around the same time. Unfortunately, the car is sitting on four-year old, really worn, 300 TW tires and I’m waiting until I can get some proper tires before taking it for a shakedown on track. I also installed the brakes with street pads and I will need to upgrade those, as well. Time and money are short at the moment, so I will try to make that happen as soon as I can. However, I have driven the car on the street and the one thing that I can confirm is that the travel on the brake pedal has increased and it was noticeable immediately. It doesn’t make much difference to me on the street, but I don’t know how I am going to like it on track.
As soon as I do a proper shakedown, I will publish my complete post and copy it to TMO. Sorry it takes forever for me to get anything done!