
In Part 1 of this series, I outlined the plan for my stereo upgrade and completely removed the stock Bose stereo. In Part 2 of this series, I installed new MB Quart component speakers and crossovers into the front doors. In Part 3, I replaced the factory 6×9 package shelf speakers with speakers also from MB Quart and installed two MB Quart amplifiers.
In this post, I will be selecting and installing a new head unit and I will be installing an iPod and iPod controller cable.
Blaupunkt Toronto 400 BT Head Unit
There isn’t anything really wrong with the stock (Gamma) head unit, but I wanted some of the features found on newer model radios. Specifically, I was looking for a head unit that featured Bluetooth capability, iPod control, and visual compatibility with the sober interior of the S4. The first two items are easy to find; many new head units feature iPod control with Bluetooth becoming more and more common, as well. However, most new head units also feature vibrant visual designs, which appeal to the younger demographic most interested in upgrading their car stereos (not middle-aged men and their old cars).
Since the factory radio is a Blaupunkt, I liked the idea of replacing it with a new model from the same manufacturer. I checked the Blaupunkt website and immediately found one that met my specifications – the Toronto 400 BT.
The Good:
- Bluetooth, AUX input (x 2), USB input, Tuner, and a CD player.
iPod control- Simple design and VarioColour display is complimentary to S4 interior
- Plugs directly into factory harness*
- Price ($189)
The Bad:
- No iPod control
- Minimilistic screen limits information
iPod Interface Cables
Say, what happened to the iPod control? The spec sheet for the Toronto 400 BT says iPod (features): via interface. Thanks to some cryptography training that I had in the Air Force, I was able to pick-apart Blaupunkt’s horribly written user manual, and it does appear that they claim that their interface cable will allow an iPod to be controlled via the head unit, though in only a very basic way, using the CD-changer controls. That was acceptable to me, so I tried to order an interface cable, but I couldn’t find one at an authorized US dealer. So, I bought one from Europe. It didn’t work.
So, I went back to a US distributor, Midwest Electronics (ME), and ordered their interface cable. It had a different part number, so I assumed that I had ordered the wrong cable for this particular head unit. Imagine my surprise when I opened the envelope from ME and found their cable was not a factory cable at all, but a hacked cable, which I call Frankencableâ„¢.

Now, why would an authorized dealer sell a hacked cable? I tried the cable and while it would play music from my iPod (sort of), I still couldn’t control the iPod from the head unit. I went back to the ME website and read the spec sheet for the cable. That’s when I noticed that it says all functions are controlled by the iPod. Okay, that was my fault for not reading the spec sheet before ordering the cable, but does it really take something as impressive as the Frankencableâ„¢ to simply power the iPod and play it through an aux input?
I went to the Internets to do some detective work and that’s when it sunk-in that despite their impressive OEM work, Blaupunkt is a very small player in the aftermarket car stereo world and it is difficult to find good user information, BTDT, and support. Still, just based upon what I see on the Blaupunkt website, particularly the iPod interface cable support page, it appears that Blaupunkt is not heavily invested in supporting iPod control. For starters, the iPod interface cable is not even currently listed in their online accessories catalog. Another clue is that their iPod to head unit compatibility list is dated November 2005! The few times I could find BTDT on the forums, the reports were generally negative, with most people having some kind of issue with the iPod control.
I finally called Midwest Electronics and to their credit, they said that they tell people that Blaupunkt does not support iPod control, period. They told me that some users get lucky using the Blaupunkt cables with certain head units, but it is not a dependable system and it is best to assume those features are simply not available. You know what that means…

I could have cut my losses right then and just sent back the head unit and cable, but the head unit looks so good in the S4, that I decided I could try to live without iPod control and just use the Frankencableâ„¢ to play the iPod through the aux input. I wouldn’t be able to hide the iPod away like I wanted, but it was better than what I had before. So, I pressed-on and continued installing the system.
Installation
Initial installation of the Toronto was straightforward. One of the reasons I chose Blaupunkt, was because they are the manufacturer of the OEM radio in the S4. This means the factory connector should plug straight into the back of the new head unit without an adapter harness. As you will soon see, I am a wiring neatnik and I liked the idea of having a direct connection. There is also a packaging issue, since the new head unit would also have two pair of RCA cables coming from the head unit, which have to fight for space behind the center console. So, the fewer wires the better.
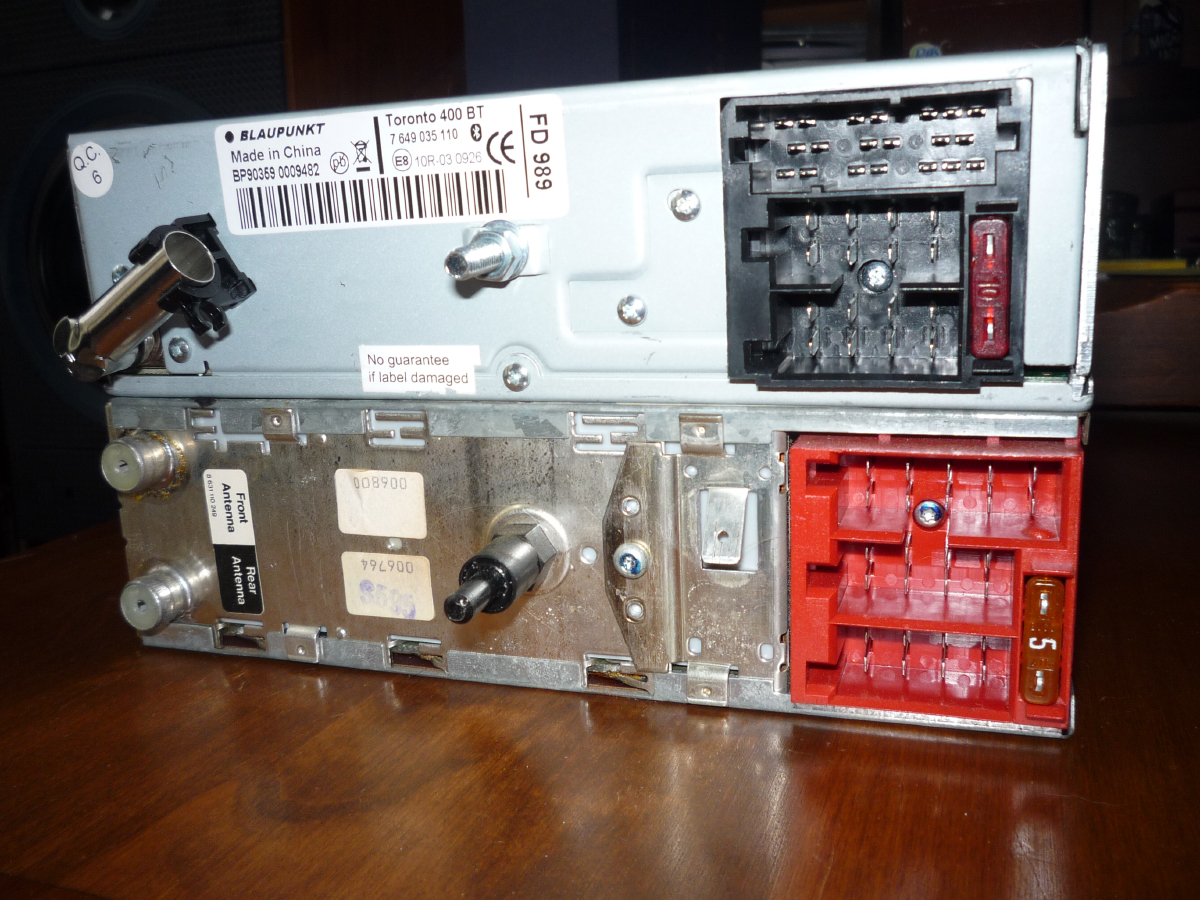
In this photo, you can see the similarity. The major difference is that connector C (top connector) has been changed to three small, separate connectors (C1, C2, and C3), which fit into the larger connector on the head unit. Connectors A and B are exactly the same style.
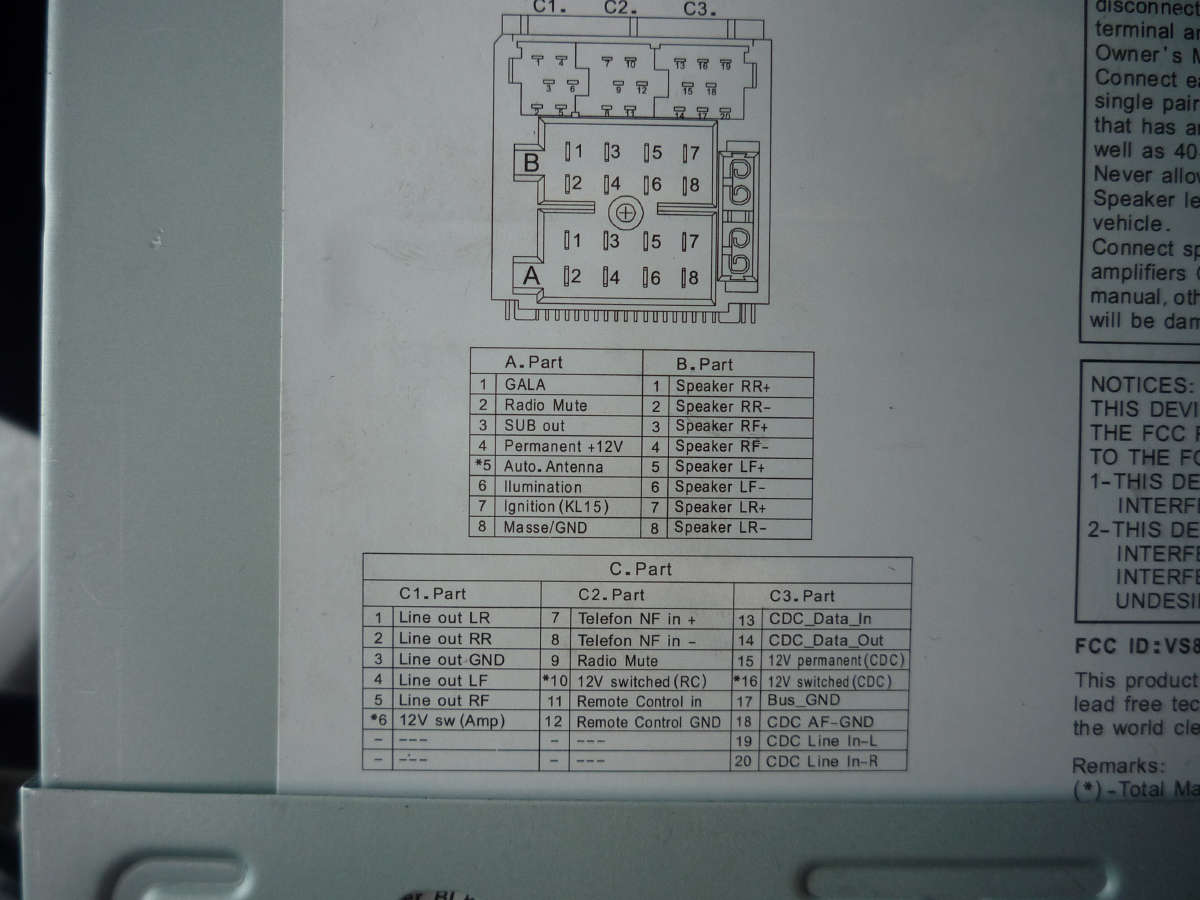
This is a pinout diagram for the Toronto 400 BT. According to the excellent Audi radio pinout spreadsheet here, pins 4 and 7 are reversed. I also discovered that pin 2 needs to be disconnected. If pin 2 is connected, the radio will stay in a permanent mute mode, as if there were an incoming telephone call. Better do this in bold for the casual reader:
Top Tip! In order to plug the factory harness directly into the Blaupunkt aftermarket head unit, you will need to swap pins 4 and 7! You will also need to disconnect pin 2. Use this diagram:

Once I made those changes, the factory harness plugged right in and the radio started right up. Connector B is not used at all in my application. Connector C (harness side) is also not used. Instead, connector C1 is occupied by a 5-channel, pre-amp out (RCA) cable and the C3 connector will be occupied by one of the two aforementioned iPod cables.
A SERIOUS Bosectomy
-ectomy – A medical terminology suffix from the ancient Greek εκτÎμειν (ektemnein), “‘to cut out.”
While I was installing the stereo, I found it easier to pull the entire center console in order to properly run the iPod cables to the armrest. I was also running a remote bass level control for a future installation of a subwoofer. While doing all of this, I started to be bothered by all of the vestigial wiring. The analog telephone can never be used again, the (aftermarket) CD changer would never be used again, and the line level wiring (Connector B) to the Bose speakers would never be used again. So, I removed it. All of it.
I cannot stress enough just how worthless the exercise was. I do NOT recommend that anyone else do this. It took many, many hours, necessitated the removal of much of the interior, you have to dig deep under the heavy carpet, and I was tattooed by the sticky, black wiring harness wrap. It was very frustrating. And for what? Just to satisfy my OCD? As I mentioned, there is some benefit to cleaning-up the wiring behind the center console, but it isn’t really necessary. Sure, I added some lightness, but not enough to make the effort worth it for anyone except crazy people, like me.

7.4 lbs. of wiring (including box). Not even enough to offset the weight of one of the amps, but man, it feels good. I might need medication.
Bring the Noise
Once everything was together, I discovered that there was a lot of system noise. I ground all components directly to the ground point at the battery’s ground strap, but the noise is persistent. I was also getting terrible noise and distortion, when using either of the iPod cables. I made this video to help Midwest Electronics help me with this problem:
The video is just a boring troubleshooting demo, but one interesting thing to note is that you can see one reason why I think the head unit is such a good fit for the S4 interior – the controls are backlit red and the screen can be made orange, which makes it the exact same color scheme as the climate control head unit. At night, the Toronto really looks like it could be a factory radio.
Anyway, after much troubleshooting, I determined that the problem was with the head unit itself, so I have sent back the radio and the adapter cable. Hopefully, Midwest Electronics will conclude the same thing and I will get a head unit that works properly.
I thought this might be the last chapter of the Bosectomy Chronicles, but it looks like there will be at least one more. In my next installment (LOL, again), I will showcase the final installation. It will either be anchored by a Toronto 400 BT…or it won’t. I can’t wait to find out.

Please pin, tweet, and share! Most importantly, let me know what you think in the comments below.


1 comment
Clean looking install. I fought very hard with the ground noise demons in the last install in a Q45 I did. Can’t remember what I did to fix it, but a few things are: maximize the output level from the head unit to the amp. You want the amp gains turned down absolutely as far as possible. Play with the routing of the signal cables. It made a difference in several installs on the noise level (even using uber shielded cables). If you don’t want to pull the ones you already installed and move them, just get some more long ones and run them on top of the carpet to see if you can find a quiet routing. And finally, ground the head unit over and above the factory wiring. If none of that works, get a live rooster…