Endurance racing in Texas is hot. I don’t mean “Megan-Fox-hot” (I did that to get my page views up), but rather “get-heat-stroke-pass-out-crash-your-car-and-die-in-the-fiery-aftermath” hot. One strategy to combat the heat and the fatigue that it causes, is for a driver to wear a cool shirt.
A cool shirt is a shirt with tubes or bladders running through it. Cold water is then pumped from an ice chest and through those tubes to cool the driver. There are companies that make professional kits, but the system is actually so simple that many folks just build one themselves. The cooler itself is nothing more than an ice chest with a bilge pump screwed into it. It’s cheap and easy to put together. There are many good resources online that show how to do this. But most people balk when it comes to making the shirt itself. It is more work than the cooler, but I suspect there is also a barrier because this project is about sewing, not generally seen as being very manly by men who deal with such mechanical things as cars. Well, that’s just silly. Ever seen Ralph Lauren’s car collection? Anyway, this is what I did.
Making a cool shirt is simple in concept, but does take some time and patience. Honestly, it might not be worth the effort. It was only worth it to me, because I already had a donor shirt, which was Nomex. That’s an important design consideration. The inexpensive professional shirts are just based on cotton t-shirts. The Nomex versions are quite a bit more expensive. If you want Nomex, there is probably more room to save money, by sourcing a Nomex shirt on your own and doing this yourself. I wanted Nomex and I already had the shirt, so the decision was easy for me.
You will need a t-shirt, some fabric for the front and back panels, some scissors, a ruler (only if you want it to look nice), chalk, and some thread.


The next thing you will need is a sewing machine. You can get this one here for about $80.

The next thing you will want to do is mod the sewing machine. Select the zebra print applique (included) for a rugged, manly look that would make Papa Hemmingway proud.

Like I said, conceptually, this project is very simple. This one picture almost shows it all. Using your ruler and scissors, mark and cut a two flat panels, which will be sewn to the shirt with rows of vertical stitches. You have to fold and pin the fabric panel in place to make channels with enough room to thread a water hose. Remember this when measuring the panel, because if you just lay it flat and measure it, it will be smaller than you want. You might have to use some maths. You can see the chalk marks, where I have marked the location of the stitches and the pins for the stitch I am about to do. I have already done a couple, using a zig-zag stitch, which is strong, but also has some give. You can also see that I hemmed the panel, so that the edges wouldn’t fray. To be clear, the stitches around the outside edge of the panel DO NOT go through to the shirt.

I’m not going to teach you how to sew, but the basic technique is to pin the panel to the shirt and then pull the pins as you sew along your chalk line. See? You pull pins. Like a grenade! Told you this project was manly. You can see that I further butched-up my sewing machine with racing stickers.

Detail of the finished shirt. If you look carefully, you can see chalk marks where I located the lower edge of my HANS. I obviously did not want the water hoses running under the HANS. The panel is made of Nomex fabric, which I got through a race shop. I also bought Nomex thread, but it was expensive and the amount I got didn’t look like enough to do the job. So, I punted and used ordinary cotton thread. I got the hose at a pet store. Obviously, you will need to obtain whatever connectors are required to interface the water hose with the cooler.

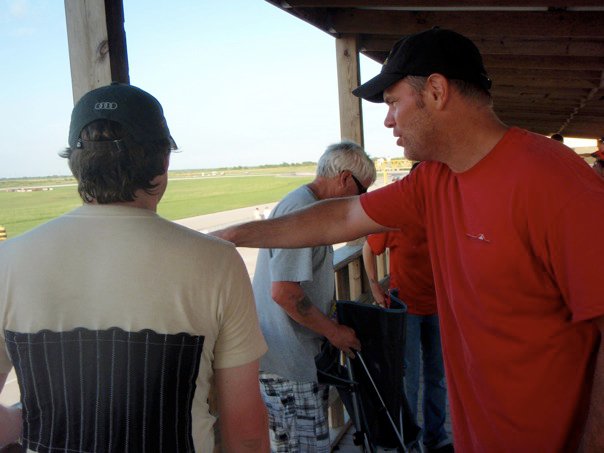
As you can see from this one and only race-day “action” shot of the shirt, the back is done in the same way as the front. You can also see that it looks like I’m wearing a corset. My friends told me that because I have the same skin tone as the shirt, that from a distance it looked like I was wearing a tube top. It seems like all the manliness I built-up in this article has vanished.
This shirt works very well. It made a night-and-day difference to how I felt in the car and how I felt afterward. In my opinion, arguments about the efficiency of any particular shirt design are silly. I suppose there are design and comfort considerations, but the fact is that any cool shirt, even a low-efficiency DIY, is very effective in fighting heat and fatigue in a race car. Fainting from the heat isn’t manly, it’s just dumb (and dangerous). I’m very happy with my DIY cool shirt.

Please pin, tweet, and share! Most importantly, let me know what you think in the comments below.


1 comment
Wow Jimmy awesome job, well done. I have been scouting around town for the last couple of days trying to find connectors that might be suitable for the job. Any hints as to what you used and what might be suitable would be appreciated.
Cheers
Craig